

- Published on
How to Resize Storage in AWS EC2: A Step-by-Step Guide for 2024
- Authors
- Name
- Armando C. Martin
How to Resize Storage in AWS EC2: A Comprehensive Guide for 2024
Are you running out of disk space on your AWS EC2 instance? Has your server shut down due to insufficient storage? Don't worry – you're in the right place. This guide will walk you through the process of resizing your EC2 instance's storage, ensuring your applications keep running smoothly.
Table of Contents
- Introduction
- Quick Solution Summary
- Detailed Guide: Resizing Storage in AWS EC2
- Troubleshooting Tips
- Best Practices for EC2 Storage Management
- Conclusion
Introduction
Managing storage in cloud environments is crucial for maintaining high-performance, cost-effective systems. AWS EC2 instances, while flexible, can sometimes require storage resizing as your data needs grow. This guide provides a step-by-step approach to increase your EC2 instance's storage capacity safely and efficiently.
Note: This guide is specifically for Linux-based EC2 instances, with examples using Ubuntu. The commands and processes may vary slightly for other operating systems.
Quick Solution Summary
- (Optional but highly recommended) Create a snapshot of your EBS volume
- Extend the EBS volume in EC2 console
- Extend the partition using
growpart - Extend the file system using
resize2fs(for ext2/3/4) orxfs_growfs(for XFS)
Now, let's dive into the detailed process with screenshots to guide you through each step.
Detailed Guide: Resizing Storage in AWS EC2
Step 1: Create a Backup Snapshot (Optional but Highly Recommended)
While this step is optional, it's strongly recommended for data safety. Creating a snapshot before making changes provides a crucial safety net in case anything goes wrong during the resizing process.
- Go to the EC2 dashboard and click on "Volumes" in the left sidebar.
- Select the EBS volume you want to extend.
- Click on the "Actions" dropdown menu and select "Create Snapshot."
- (Optional) You can leave all fields empty in the snapshot creation form.
- Click the orange "Create Snapshot" button at the bottom of the form.
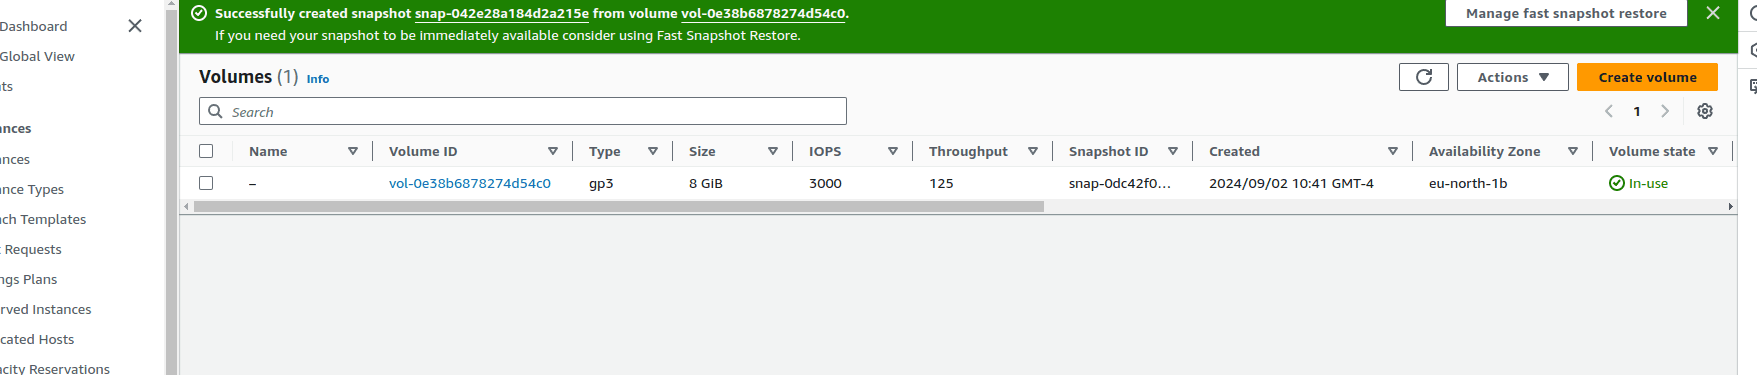
After the snapshot is complete, you have a safety net. If anything goes wrong during the resizing process, you can recover your server from this snapshot, ensuring you don't lose any data.
Step 2: Extend the EBS Volume
- In the EC2 console, go to the "Volumes" section.
- Select the volume you need to extend.
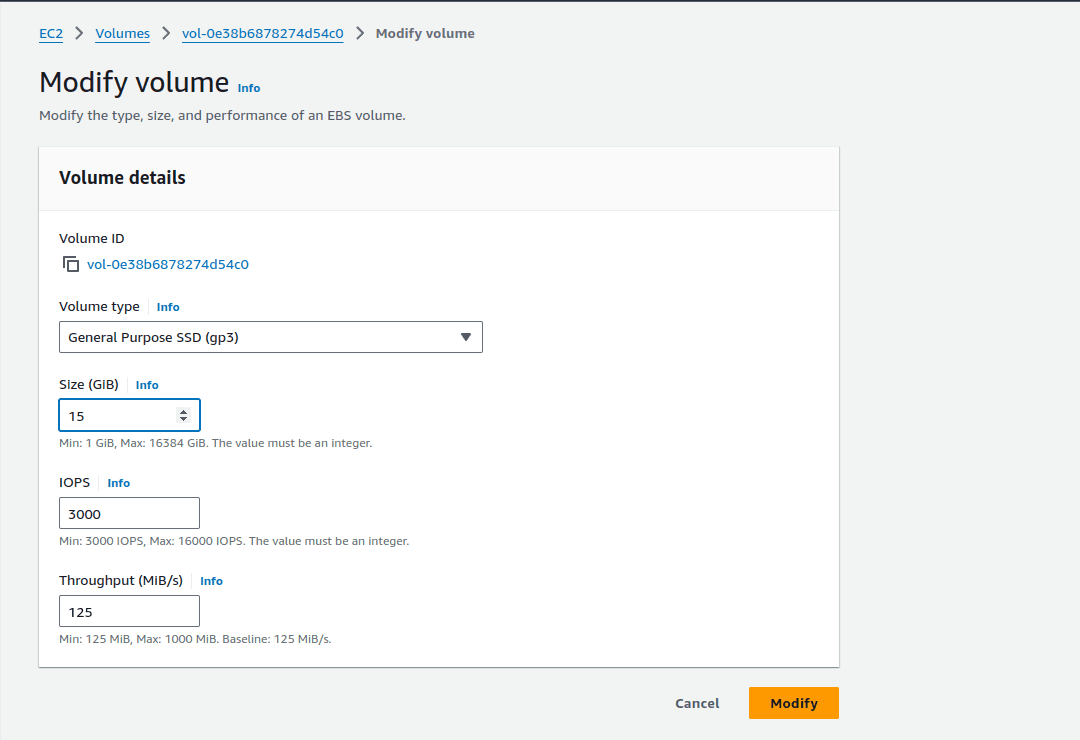
- Click on the "Actions" dropdown menu and select "Modify Volume".
- In the "Modify Volume" dialog, enter your desired new size (in GiB).
- Click "Modify" to confirm.
Monitor the modification process in the EC2 console. You can check the status in the "State" column of the Volumes list.
Step 3: Extend the Partition
Once the EBS volume modification is complete and shows as "in-use":
Connect to your EC2 instance via SSH.
Identify the block device of the volume you resized:
lsblkor
df -Th
Now you can see your disk with the space you set, but the partition on the disk is still at its previous size. We're going to change that now. In this case (see image), "/dev/nvme0n1" is the disk name and "p1" is the partition number.
Extend the partition using
growpart:sudo growpart /dev/nvme0n1 1Replace
/dev/nvme0n1with your device name and1with the partition number if different.

Step 4: Extend the File System
The command you use depends on your file system type. Check your file system type with:
df -Th
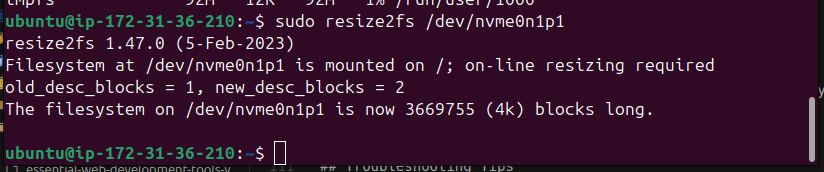
For ext2/3/4 file systems:
sudo resize2fs /dev/nvme0n1p1
Replace /dev/nvme0n1p1 with your partition name if different.
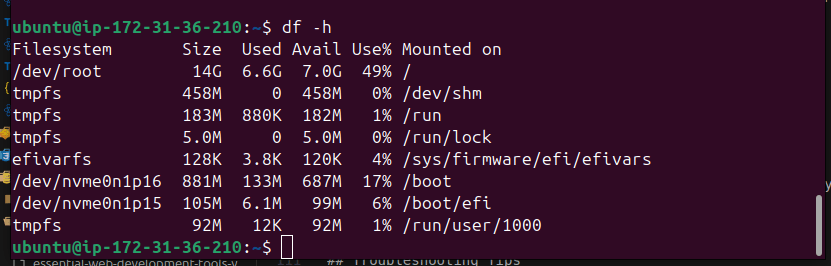
Step 5: Verify the New Size
Check that your volume has been successfully resized:
df -h
You should now see the increased storage size available to your instance.
Troubleshooting Tips
- If you encounter any issues, you can always restore your instance using the snapshot created in Step 1.
- Make sure you have the necessary permissions in your AWS account to modify EBS volumes.
- If your instance doesn't recognize the new space immediately, you may need to reboot it.
Best Practices for EC2 Storage Management
To avoid frequent resizing and optimize your EC2 storage usage, consider these best practices:
Regular Monitoring: Set up CloudWatch alarms to alert you when disk usage reaches a certain threshold (e.g., 70%).
Data Lifecycle Management: Implement policies to archive or delete old, unnecessary data.
Use Elastic File System (EFS): For scalable, shared storage needs, consider using Amazon EFS alongside your EC2 instances.
Optimize Your Applications: Regularly review and optimize your applications to minimize unnecessary disk usage.
Consider Separate Volumes: Use separate EBS volumes for your operating system and your data for easier management and backups.
By following these practices, you can maintain optimal storage performance and reduce the frequency of resizing operations.
Conclusion
By following this guide, you should now have successfully resized your AWS EC2 instance's storage. Remember to monitor your storage usage regularly to avoid running into space issues in the future. Consider setting up CloudWatch alarms to alert you when your disk usage reaches a certain threshold.
For more information on managing EBS volumes, check out the official AWS documentation.
Happy cloud computing!